Your Pakayak Bluefin has arrived. It’s nested down to 42 inches in its rolling bag, and you’re standing in the driveway, ready to get on the water. The six sections and set of stainless steel clamps might look unfamiliar at first, but this kayak is engineered so the pieces fit together in only one way. There’s no guesswork, no loose hardware, and no instruction booklet to hunt for. Pakayak even sticks an assembly label right on the bulkhead of Section 3, visible the moment you unzip the bag.
Pakayak advertises under 3 minutes assembled. Real first attempts typically run 6–8 minutes. By your third session, 3–4 minutes is realistic for most paddlers. This guide walks you through every step, from unpacking through clamping, seat installation, and bag stow, so your first assembly goes smoothly, and every one after that gets faster.
What You’re Working With: The Six Sections
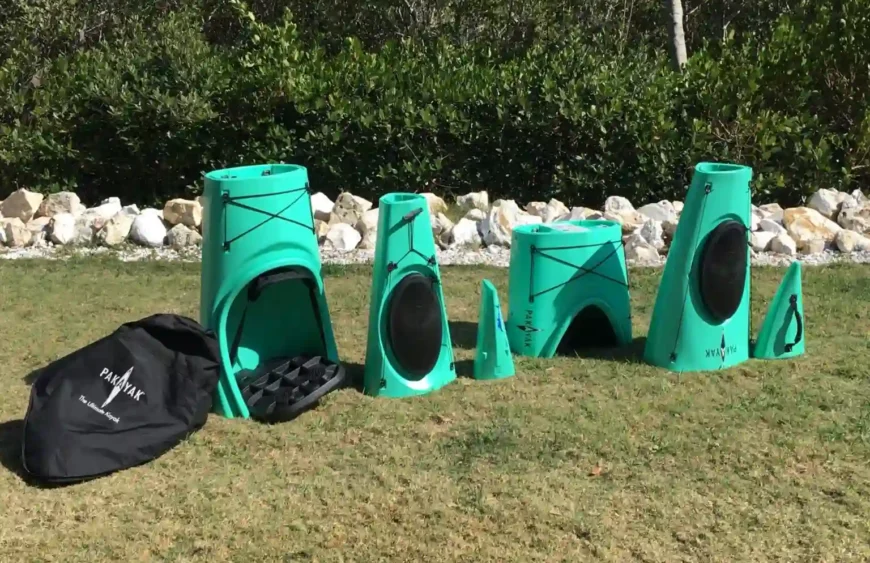
The Bluefin is built from six individual rotomolded sections that nest concentrically inside each other when packed, collapsing a 14-foot 2-inch kayak into a 42-inch rolling bundle. Each section connects to the next via a tongue-and-groove joint, sealed by a silicone gasket and locked by patented stainless steel clamps rated at over 500 lbs of holding force each. From bow to stern, the six sections are:
- Section 1: Bow (nose of the kayak)
- Section 2: Front hatch section
- Section 3: Front cockpit half (the assembly instruction sticker is on this bulkhead)
- Section 4: Rear cockpit half
- Section 5: Rear hatch section
- Section 6: Stern (this has the Hull Identification Number)
The assembly method builds two independent vertical towers, a bow half (Sections 1–3) and a stern half (Sections 4–6), before laying them flat and clamping the cockpit together. This two-tower approach is what makes solo assembly practical and fast. The same general method applies to the AnglerFish Pakayak’s sit-on-top hard-shell fishing model, except the hull sections are all assembled laying flat, so the process transfers directly if you ever paddle both.
Before You Start: First-Time Tips Worth Reading
These come directly from Pakayak’s own quick-start guide. Spend 60 seconds here and your first assembly will go noticeably smoother.
Assemble on a soft surface first: Grass, a blanket, or a carpeted garage floor protects the hull from scratches during your learning run and keeps the tongue-and-groove joints aligning naturally on a flat, even base. Hard, uneven concrete works against you.
Preview the clamp locations in Sections 1 and 6 before stacking: The clamps at the bow and stern tips sit inside the hatch areas, and they become hard to see once those sections are placed. A quick look before you start, literally 10 seconds, means you’re not fumbling blind when it counts.
Expect the clamps to feel stiff at first: That’s intentional. Each clamp is engineered to apply over 500 lbs of compressive force to create the watertight seal. They soften slightly with use, and most paddlers find them comfortable by the third or fourth assembly. If your hands are sensitive, gloves help on the first couple of runs.
Latching technique matters more than strength: When engaging a clamp, rotate the lever until it contacts the curved band, then push the lever completely onto the pin before latching. A half-latched clamp will spring open, this is a built-in safety feature, not a defect. If a clamp pops open after you let go, it didn’t fully seat. Reset and try again.
Step-by-Step Assembly
Step 1: Open the Bag and Remove the Seat
Stand the rolling bag upright on a flat surface. Release the buckle straps and unzip the bag fully, flipping the front panel back to expose all six nested sections inside. Before pulling any sections out, remove the foam seat that sits nestled at the front of the bag and set it aside, you’ll need it later as a prop and for the final seat install.
Step 2: Build the 2 Towers
Starting with the top section in the upright bag, section 3, pull it off the stack and set it open end down on the bag or a towel. Next, take the next section, section 4, off the stack and set it next to section 3 also with the open end down. The next section to come off the stack is section 2 and it stacks on top of section 3, place it there, open the hatch cover, reach in and latch all 4 clamps. The next section on the stack is section 5 and it goes on top of section 4. Remove the hatch cover, reach in, and latch all 4 clamps just as you did with section 2. Next is section 6. Place it on top of section 5, reach in through the hatch and up to find the clamps, completely rotate the lever back against the band spring, pull down to engage the jaws of the clamp on the latch pin and rotate the lever down to securely latch the clamp. Repeat for all 3 clamps in the stern section. The final section is the bow which is placed on top for section 2 but before placing it, remove the black protective wrap covering the part. This wrap protects the joint during shipping and storage. Once removed, secure it immediately to one of the bag straps so it doesn’t end up as beach litter. Secure all three clamps as you did for section 6.
The sections will seat firmly, there is only one correct orientation, so if it doesn’t feel right, rotate 180 degrees and try again.
You now have 2 three-section towers standing upright and fully clamped.
Put both hatch covers back on making sure the arrows on the hatch covers are aligned with the midline of the top deck and the hatches are fully clipped onto the hatch rim all around.
Pro tip: If the front or rear hatch section clamps are hard to reach and latch, brace your forearm against the inside of the hatch area for leverage. It makes a real difference.
Step 3: Join the Two Halves
Lay both towers down on your soft surface and slide the cockpit ends toward each other. The cockpit posts on one half align with receiver holes on the other. When correctly positioned, the 2 posts and tongue and groove are all engaged before clamping. Take a moment to confirm the alignment before moving to the clamps.
Flip the cockpit pad aside to expose the five cockpit clamps. Latch them in this specific order: center clamp first, then work outward toward the cockpit rim on both sides.
Begin by latching the center bottom clamp in the cockpit section. Latch the clamp to each side next. If the ground is uneven, the last 2 clamps at the top of the cockpit rim may be too far apart to latch. If that is the case, take the seat and put it under section 5 with the “V” shape under the keel. This will level out the ground and bring the sections together so you can easily latch the last 2 clamps.
The center-first sequence is important because it seats the silicone gasket evenly at the midpoint before the outer clamps compress it from the edges. Rushing to the outer clamps first can leave the joint slightly misaligned and make the center clamp harder to engage. You’ll feel each clamp lock with a distinct click as the lever seats on the pin.
When all five are latched, the cockpit joint is held by over 1,700 lbs of combined clamping force. Run a finger along the full length of the cockpit seam, it should feel flush and continuous with no raised edges or gaps. Any irregularity means one clamp needs reseating.
Step 5: Install the Seat and Stow the Bag
Fit the foam seat under the cockpit flange and clip both buckles. Adjust the seat back to your preferred paddling position using the adjustment straps, and set the foot braces to your leg length. They’re flag-style adjustable and lock into position with a push.
Pro tip: Unlock the pedals and move them to the middle of their adjustment before you get into the kayak. This will allow you to adjust them with your feet and lock them into place once you are in the kayak.
For the bag: starting at the top, roll it down tightly, fold the side flaps of the bottom up, and cinch it using the provided strap looped through the outside bag straps. Slide the cinched bag behind your seatb ack with the wheels facing down to one side. It fits neatly in the behind the seat and travels with you on the water, ready for repacking when you return.
That’s the complete assembly. You’re ready to paddle.
Assembly Time by Experience Level
| Experience Level | Realistic Time |
| First attempt | 6–8 minutes |
| After 2–3 sessions | 4–5 minutes |
| Regular paddler | 3 minutes or under |
The sections themselves go together quickly from day one, the tongue-and-groove joints are intuitive. The clamps are the only real learning curve, and that curve is short. Once your hands have done the motion four or five times, the whole process becomes muscle memory.
How to Disassemble (Pak Your Yak)
Packing up is the assembly sequence in reverse and takes the same amount of time once you know the process.
- Flip the cockpit pad back to expose the clamps. Unclip the seat and set it aside.
- Unlatch all 5 cockpit clamps, push the thumb lever back slightly before pulling up on the handle. Maintain a firm grip on the lever to control the spring release.
- Set foot braces all the way down toward the bulkhead and lock them in place.
- Retrieve the bag from behind the seat and open it on the ground.
- Stand each half upright into a tower, one bow-up, one stern-up. Be sure to put the kayak towers on the bag or a towel to avoid damaging the mate sections or getting sand or debris onto the seals.
- Open each hatch and unlatch the 3 end clamps, then work down each tower, unlatching and nesting each section inside the one below. The first section to go in the bag is the bow and it needs the protective cover. The next section is the stern and it should be placed on top of the bow section but turned 90 degrees to one side.
- Section 5 is the next section to go on the stack and after the clamps are unlatched, put the hatch cover back in place before taking it off section 4
- Section 2 is next and the hatch cover should also be put back in place before it is taken off section 3.
- Section 4 is next, just pick it up and place it over section 2. Be sure to pull the bag out from underneath the part as you put it in the bag.
- When placing section 3 into the bag, be certain to flip the cockpit pad over the clamps and keep it ip place to prevent the clamps from scratching section 4 while packed.
- Finally, don’t forget your seat! Place the seat “v” against the logo on section 2 and push it down to the bottom of the bag.
- Zip the bag closed and latch the webbing straps to stabilize the load. You are ready to roll the bag back to your vehicle.
After saltwater use: Rinse the hull, silicone gaskets, and all clamp hardware with fresh water before packing. The clamps are 100% stainless steel, but a freshwater rinse after salt exposure is good long-term maintenance practice.
FAQs
Do I need any tools?
No. Assembly is entirely tool-free, no pumps, no wrenches, no additional hardware of any kind.
Can I assemble it alone?
Yes. The two-tower method is specifically designed for solo assembly. No second pair of hands needed at any point.
What if a clamp won’t latch?
The joint isn’t fully seated. Back the section off slightly, realign the tongue-and-groove, reseat firmly, and try the clamp again. A properly seated joint will clamp with firm but manageable hand pressure.
How long do the gaskets last?
Pakayak rates the silicone gaskets at 75 years. Gasket replacement is not a routine maintenance concern.
Does assembly get easier with time?
Significantly. Most owners report that the process feels fully automatic by the third or fourth attempt.
Ready to Paddle
Six sections, nineteen clamps, one seat, and you’re on the water. The first assembly takes longer than the box suggests, that’s true for everyone. But the process is logical, the kayak makes it hard to go wrong, and every subsequent assembly is noticeably faster than the last.
If you’re still deciding whether the Bluefin is the right kayak for you, read the full Pakayak Bluefin review for an in-depth look at on-water performance. And if you want to understand the engineering behind why a nesting kayak works the way it does, the full story is here: What Is a Nesting Kayak? How Pakayak’s Patented Design Changed Everything